
I’ve discovered that tanning a rabbit pelt isn’t time-consuming, difficult, or expensive. In fact, it’s a source of both pride and great satisfaction, since it enables me to create beautiful, useful fur articles from skins that would otherwise have been discarded.
You probably know that tanning (which is also called tawing or pickling) is the process of converting a raw hide into leather, thus making the skin more pliable, more durable, and more resistant to water, wear, and decay.
You may be surprised to learn, though, that home tanning costs very little and requires a minimum of equipment. In fact, you’ll find that your biggest investments in the craft will be your time and energy.
The availability, convenient small size, and variable colors, patterns, and textures of rabbit skins make them perfect material for the novice tanner.
Before I describe in detail how to tan a rabbit hide, bear in mind this important point: No tanning formula is foolproof. There are no shortcuts to learning this skill. You’ll need to practice, practice, practice!
However, I’m not a professional furrier. I’m only a homesteader raising some rabbits to help keep my family supplied with meat and extra cash. So take heart: If I can tan pelts, so can you!
Butchering a Rabbit
As most breeders are already aware, once a rabbit has been killed and the head removed, it is suspended by one or both back legs to allow the blood to drain. Thus hung, the animal is then flayed, which is a term referring to the act of removing the hide from the carcass.
To perform this task, simply cut the skin around each hind foot and carefully slit (or tear) the hide inside each leg from hock to anus (be careful not to slice into the meat). Strip the skin from the carcass by gently pulling downward toward the rabbit’s head (the motion is somewhat like that used when peeling a banana but a bit more force will be required). Use your fingers or a sharp skinning knife to loosen any difficult spots.
The freshly flayed hide (which is known as a “green” skin) is now cased, or sleeve-pulled,to put the fur on the inside and the flesh on the outside. Let the cased pelt soak in cold water while you finish dressing out the carcass and storing the meat in your refrigerator or freezer.
Washing and Cooling the Skin
Once the butchering duties are finished, thoroughly rinse the hide in more cold water to finish cooling it as quickly as possible. Don’t worry about any remaining fat and tissue at this point. Rather, apply your effort to washing away all the blood left in the skin, since any that’s not removed will leave permanent brown stains in the leather after tanning.
Soap or detergent is really unnecessary, but if you do use such a cleanser, be sure that all traces of that are rinsed out before you proceed, too. With the rinsing done, carefully squeeze (never wring!) the excess water from the pelt.
Thoroughly cleaned hides can be preserved for later processing by freezing; drying on a stretcher, or salting and drying. I store my pelts in the freezer if I have more than I can comfortably work on at one time.
Before freezing them, though, I make sure that all the body heat is cooled from the skins, and that the excess water has been pressed out. Then I wrap the hides in freezer paper — or store them in airtight containers — to prevent dehydration and freezer burn.
Leave them in the freezer for the shortest time possible, because extended freezing can loosen the hair and cause the finished hide to shed.
A hide can be opened up — that is, split from head to tail along the belly’s midline — at any time during the tanning operation, but I prefer to wait until the process is complete to do this.
The First Tanning Solution
When the pelts are clean and cooled (or have been defrosted, if you’ve been sidetracked for a while), you’re ready to begin tanning. You’ll first need to round up a four- to six-gallon plastic container (a wastebasket or bucket will work fine). Then pour two gallons of room-temperature (about 70°F) water into the pail, and add either — but not both — of the following recipes. (Each formula will be adequate to tan six to nine medium-sized pelts.)
TANNING RECIPE NO. 1: SALT/ALUM
1 cup of coarse or granulated salt (not iodized)
1 cup of common alum (aluminum sulfate or any of several similar double sulfates), powdered or granulated
TANNING RECIPE NO. 2: SALT/ACID
1 pound of coarse or granulated salt (about 1 3/4 cups)
1 ounce of full-strength sulfuric acid, or 4 ounces (1/2 cup) of battery acid (dilute sulfuric acid)
You can buy a five-pound sack of the necessary salt at almost any grocery store (look for noniodized pickling salt) for about $1.00. And larger quantities (usually 100-pound sacks) are available from chemical companies and other sources at “bargain” bulk prices.
Alum is stocked by biological supply companies, handicraft and leather shops, chemical suppliers, pharmacies, and feed stores. It comes in both a commercial and a medicinal grade (for tanning purposes it makes no difference which you use) and generally costs between $1.00 and $3.00 per pound.
Battery acid (electrolyte) is available from auto supply houses for about $1.00 per gallon (128 ounces) and is usually sold in five-gallon containers. (I’ve never worked with full-strength sulfuric acid, because I feel it’s too dangerous.)
Both recipes work well and take approximately the same amount of time. I prefer the somewhat more expensive alum mixture because it produces a whiter, softer leather with the feel of fine suede. Also, I prefer the first recipe because it uses common cooking spices used in making pickles, so it is safe if small children put them in their mouth or pets chew on them.
Once you’ve determined which method you’re going to use, add the chemicals to the water (don’t let them splash). Make sure the powders are completely dissolved before you add the pelts. Be certain to show respect for your chemicals and to handle them properly. (Wear rubber gloves and eye protection if you’re working with sulfuric acid.)
Now, drop each skin into the pickle (as the tanning mix is called) and swish it around with a wooden stick or spoon (or use your glove-sheathed hands) to work the solution into the fur and skin. Allow the pelts to remain in the brine — at room temperature (65-70°F) — for 48 hours, stirring them at least twice a day. If the pelts tend to float to the top of the solution, weigh them down using a glass jug filled with water or a clean rock.
After the two full days have passed, squeeze the excess brine from the skins (save the solution, you’ll reuse it later) and rinse them in cold water.
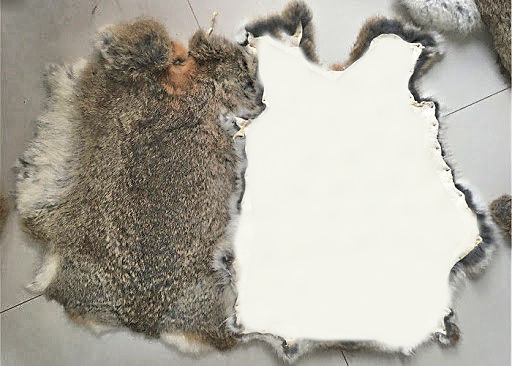
Fleshing the Hide
Fleshing is the process of removing the fatty tissue and flesh to expose the actual leather (or derma) to chemical action. Rabbits have a clearly defined undertissue which, after the first chemical soaking, can be peeled off in one piece (if you’re careful).
Since the flesh separates most readily at the rump section, I usually start there and peel toward the neck. A steak knife can be used to scrape and loosen the difficult areas you’ll likely encounter on the belly and around the legs.
Be careful not to peel too deep and expose the root hairs, but do try to get off as much fatty tissue as possible.
When you’re finished, rinse the fleshed hides in cool water and then squeeze out the excess liquid.
The Second Tanning Solution
Now, go back to the recipe you chose before, add the same amount of salt/alum or salt/acid as you used in the first soaking solution to the reserved brine, and follow the same mixing procedure. Put the pelts in the liquid, one at a time, working each hide thoroughly to coat it with the pickle. Keep the skins soaking at room temperature for seven days, stirring them at least twice a day.
You can test for tanning “doneness” after the week’s up by simply boiling a small piece of hide for a few minutes in water. If the leather curls up and becomes hard and rubbery, return the pelt to the solution. A well-tanned skin will show little or no change in boiling water.
Drying and Fluffing
After one pelt has tested “done,” remove all of them from the solution and squeeze out the excess pickle. The tanning brine will likely be pretty much used up if you’ve soaked the recommended number of skins, but any liquid that does remain should be dumped out.
Take care to discard the mixture where farm animals can’t drink it and the chemicals won’t contaminate drinking water. Although it’s not poisonous to handle, the acid brew might be fatal if taken internally. I generally pour any leftover solution from either formula along pathways to keep them free of weeds.
Next, wash each pelt thoroughly with a mild detergent. I use an inexpensive cologne-scented shampoo that leaves the fur soft, fluffy, clean, and sweet smelling. Then rinse the hide several times in lukewarm water and squeeze out the excess liquid.
Hang the pelts in the shade to dry (I usually put them on a temporary clothesline suspended over the bathtub). It’ll take from six hours to two days for the skins to become fully dried, depending on the temperature, the humidity, and the thickness of the leather.
Don’t ever put wet hides in direct sun or near a heat source, as they’ll quickly shrink and become brittle as they dry.
When the pelts are just barely damp, toss them in an electric dryer, with no heat, for 15 to 45 minutes. This step can be omitted, but the machine fluffing does make the fur easier to work with and the next procedure less difficult.
Working the Leather
Ever since animal hides were first turned into leather, they’ve been pounded, rubbed, chewed, and beaten — and often anointed with grease or oils — to make (and keep) them flexible and soft. I stretch partially dried hides to soften the leather, using a process known as breaking the skin.
Pull the skin of your damp pelt in all directions, working only a small area at a time. The leather will begin to turn soft and white. The trick is to catch the hide while it’s still slightly wet and limp. If it becomes too dry and turns hard, resoak it with a wet sponge (this is called damping back) until it’s pliable enough to stretch again.
Be firm as you pull the leather, but don’t use too much force, or you might tear it. Keep up the skin-breaking procedure as long as necessary until the pelt remains soft as it dries.
“Broken” hides may be tacked to a board or frame at this time to encourage them to dry flat, but this will make small holes in the hide.
Finishing and Storage
After the hide has dried and is sufficiently soft, give the fur a good brushing with a small hairbrush. Then massage mink oil (I buy it at shoe stores. An eight-ounce container, which is enough for several dozen pelts, costs about $2.00) into the skin side of the hide with your fingers.
You’ll be glad to know that mink oil is a wonderful hand conditioner. As a final, optional step, try buffing the leather with pumice or fine sandpaper to give it a soft, velvety feel.
Rabbit fur, like all leathers, breathes; that is, it contains microscopic spaces for air circulation. Therefore, it’s best not to store rabbit pelts (or any other fur or leather) in airtight containers (except, of course, when you’re freezing them before tanning).
I keep my finished hides in a cardboard box with a bar of sweet-smelling soap, which repels insects and helps to scent the furs.
Preventing Failures
Although the procedure itself is simple enough, really successful pelt tanning is usually the result of ingenuity and perseverance. The secret is not so much the chemicals used as it is the elbow grease that you apply to make the hides soft and supple.
Keep in mind that each piece of leather is different. And even among hides that were all tanned in the same batch of solution, something will occasionally go wrong with one or more of the skins.
The problem I encounter most often is hairslip: bare patches that appear as the fur pulls or slips off the leather. This condition, which is also called taint, results from the growth of bacteria on the outer skin (decay) and usually occurs in folds and wrinkles, where the surface wasn’t exposed to the tanning solution.
It can be prevented if you stir the pelts around in the solution frequently and make sure that the liquid comes in contact with all parts of each hide. Take care, too, that the brine ingredients are dissolved and mixed well before adding the skins.
Finally, don’t store the pelts in the solution at temperatures over 80°. If hairslip does afflict a pelt or two, however, you can trim away the damaged sections when constructing garments or other articles.
Alternative Tanning Processes
The tanning technique I’ve described here is a simplified version of chemical tanning. There are also vegetable and oil tanning methods, neither of which is well suited to preserving rabbit skins.
Most of the other chemical processes in use today would require additional equipment, extra labor, and complicated ingredients.
In general, these systems involve the application of a paste or powder (common ingredients might include alum, acids, sodas, salts, animal brains and livers, oils, and vegetable tannins) to the fleshed skin. The substance must be reapplied several times over the course of a few days, with the residual material scraped off the hide before each new application.
Not only are such processes too time consuming to fit into the schedules of most busy homesteaders, but they also require the green hide to be fleshed before the application of the tanning agent.
The mere thought of spending hours scraping fat and tissue from a hide is enough to discourage most folks from even attempting to tan furs. The chemical method I’ve recommended, on the other hand, requires only a minimum of scraping, which can be accomplished within five to ten minutes.
You now know how to tan a rabbit skin
 If you follow my instructions, you should be the proud possessor of a stack of soft, silky rabbit pelts … which you can either sell as is or fashion into beautiful garments and other items for sale or barter.
All in all, rabbit-pelt tanning can add a whole new dimension to a homesteader’s small-scale hare-raising operation. If you’ve even the slightest inclination to make full use of your backyard bunnies, just take a little more care at butchering time and tan those hides!