Making a native american style hairpipe choker is a relatively easy project for both children and adults. Smaller children may need some supervision.
In these native american choker instructions, we are going to make the Blue Chevron Hairpipe Choker with four rows shown below. You can purchase a native american choker kit with everything you need to make this choker in our catalog. Or substitute whatever beads and hairpipes you like, for your own style.
History of native american hairpipe chokers
Breastplates and bone or horn hairpipe chokers were worn by the Plains Indians for hundreds of years. They were made from a variety of materials including horn and bone hairpipe, deer or elk hide and glass beads.
Originally used as protection against arrows and spears in battle, they continued to be worn by Native Americans in battle even after bullets were introduced and they no longer provided physical protection against the enemy.
This is because they provided much more than just a layer of defense. They also provided spiritual protection to the men who wore them, giving a sense of strength and security to them as they fought for their tribes.
The decorations on each particular breastplate or choker were deeply meaningful to its owner and often included feathers, quills, claws, handmade beads, shells, ermine tails, and mirrors, etc.
Today, these items are worn by traditional native american dancers at pow wows and for personal adornment on other special occasions. Some people today have a favorite choker that they wear all the time, just because they want to.
Hairpipe beads used in native american chokers
In the past, hairpipe beads were made primarily from the American buffalo, but also from small leg bones found in animals such as the coyote or badger, or even bird bones. Today they are mostly made from water buffalo in India or sometimes camel bones.
The traditional size hairpipe for an adult choker is 1.5″ (3.81 cm) long, but if you have an extra large neck, you might want to use 2″ (5.08) hairpipes. For young children or very petite women, 1″ (1.27 cm) hairpipes might fit better. If you want a more intricate pattern, smaller hairpipes or more than one size of hairpipe might also create a pleasing pattern.
Hairpipe beads are available in white buffalo bone, black buffalo horn, amber horn or cherry horn.
The beads shown in this choker are 8mm Chevron beads, but beads that are anywhere from 6mm to 12mm can look nice in a choker. String a row and see if you like it. If not, move things around until you get a look that is right for you.
You want an odd number of hairpipes in each choker row if you are going to have a centerpiece. The right side should mirror the left side in reverse, with an additional section in the middle of the choker if you want a focal point.
For a fine traditional choker, I use traditional materials like glass trade beads, natural semi-precious gemstones, shells, bone, and horn. Glass crow beads (also commonly called pony beads in the plastic trade), are often used as spacers in native american style hairpipe chokers.
For a child’s project you might want to substitute plastic beads for a lower cost.
If you would like your hairpipe choker to look old, soak your white hairpipes in a strong solution of tea or coffee overnight. Each bead will absorb color in different patterns. Some beads will be darker than others. It’s this random coloration pattern that makes it look like your choker aged naturally over time.
Instructions to make a hairpipe choker:
Cut a piece of artificial sinew long enough to go around your neck, plus about 6 inches.
Split the sinew into four or five strands, depending on the brand of artificial sinew you have. The brand we have splits into five strands.
 If your beads have big enough holes, you can leave the sinew unsplit for a stronger stringing material, and just cut four pieces the length you need.
Knot two of the split sinew strands together in an overhand knot about 3″ from the end. Tie a couple more knots on top of the first one and seal it with a drop of superglue. Repeat in pairs until you have the number of strands you want in your choker. For the above choker, you will need two pairs.
You will need a bone spacer or leather spacer between each section of hairpipe to tie your rows together and prevent them from sagging and having unneccesary spaces between the rows.
 I used commercially available spacers, because they are uniform in size, inexpensive, and save time, but if you want to make your own spacers, punch one hole for each row in your choker about 3/8″ (0.9525 cm) apart.
For a four row choker, I use a spacer that is about 1.5″ long and about 1/4″ wide (3.81 cm x 0.635 cm). You can make your spacers out of the same leather you use for your ties, but it works best if your spacer is somewhat stiff, like cowhide, bone, or horn, for example.
Pull each set of strings through a spacer, with the knot centered between the holes on the back of the spacer. Then string a Chevron Bead (or whatever beads you’re using), then a hairpipe bead, then another Chevron bead, then add the next spacer. You should have a spacer between each bead/hairpipe pattern, and end with another spacer on the other end.
 Pull your strings tight and knot each pair of strings together at the end on the outside of the spacer. Apply a small drop of superglue to each knot. I like to tripple knot and superglue everything, just to make sure it won’t come apart with extended wear or rough handling.
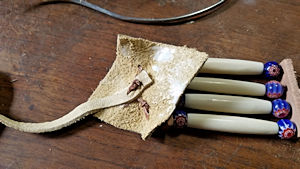
Next, cut two squares of leather that are about 1.5″ x 1.5″ (3.81 cm x 3.81 cm)and fold them in half so they form a triangle. You don’t have to be too precise when cutting the tabs, because we will be cutting off the excess at the end, but it is better to err on it being too wide than not wide enough.
Using a Glover’s needle or an S needle, pull your four strings through the triangle tab, being careful to space the threads evenly, and at least 1/4″ (0.635 cm) from the edge of the tabs.
If you are using a Glover’s needle, you may want to prepunch the holes the sinew goes through. With an S needle, this is not neccesary. It will go right through deerskin, elkskin, or even buffalo hide with little effort.
You should now have the smooth side of the leather facing outward, with your sinew inside the rough side. Tie your pairs into knots again 3 times and add a bit of superglue to the knots.
Cut a lace about 1/4″ (0.635 cm) to 3/8″ wide (0.9525 cm) x 10″ (25.4 cm) or whatever length you want for the tie.
 Combine each pair of sinew strings into one thread and stitch through the end of the lace about 1/4″ apart, but not through the triangle, then tie all the strings in a knot and cut off the excess and apply superglue to the knot.
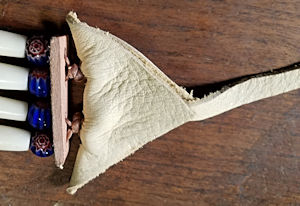
Apply a tacky glue (you can get Alene’s Tacky Glue at Walmart) to the back of the tie, gluing it to the tab in the center of the point of the triangle, and also put tacky glue on the other side of the tab and glue the two sides of the tab together so you have a triangle, with the tie centered in the middle of the triangle.
Cut off the edges of the triangle that stick out past your outside hairpipe rows, being careful not to cut the sinew strings inside the tab.
Repeat the triangle and tie process on the other end.
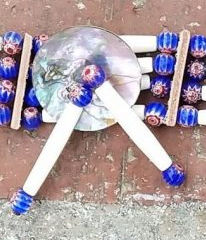
 Cut another piece of sinew about 6 to 8 inches long (15.24 cm to 20.32 cm). I like to allow a little more length than I think I need. Tie the sinew around the two middle hairpipe in the center of the choker and tie a knot.
Apply a drop of superglue where the sinew crosses the back of your choker. Add a 1.5″ to 3″ (3.81 cm to 7.62 cm) centerpiece, such as an abalone shell, antler button, pink shell, bone disc, or other trinket to the sinew strings.
Then split your sinew into two strings, and repeat your Chevron bead, hairpipe, Chevron bead pattern on each string.
 Split each sinew string and tie several knots until the knot is big enough that the final bead won’t come off. Poke the knot up into the bead with your needle and put a dab of superglue on each knot and your choker is finished!
Alternatively, you could add a feather to the end by gluing it inside the last bead, or other trinkets of your choice.


